%20small.png)
Katapult Pro Pole Attachments Portal Configuration
- Leanne Weaver
- Oct 16, 2023
- 12 min read

Updated: Oct 21, 2025

CONTENT
- Timers
- Warnings
Katapult Pro's pole attachments portal is the most important feature of our Application Management offering. The public-facing portal can be configured to accept and manage whatever application types, workflows, notifications, timelines, and actions your team needs to serve attachers in your footprint without sacrificing safety, reliability, or data transparency. Read more below to find out how you can leverage these tools to their potential.

For configuring your portal, you'll want to visit the Model Editor. On the left-hand side, there are three different areas to configure your portal - Application Types, User Options, and Display Options. Let's take an in-depth look into each of these.
Application Types
Application types are used to differentiate between various third-party attachment workflows. Users configure each application type individually. Common examples of application types include:
Attachment Application
One Touch Make Ready Application
Overlash Notification
Removal Application
Small Cell Application

To create a new application type, click on the blue "+" icon and name your application type. The Model Editor will then open up the new application type and its eight sections for customizing the application type.
Only allow the utility to create this type of application

This checkbox controls whether the creation of this application type is restricted to only the utility. If checked, third party companies cannot create this type of application.
Allowed Attachers Filter
The "Allowed Attachers Filter" is optional, and it uses custom logic to control who is allowed to create this application type. The logic returns a TRUE or FALSE value. You can read more about the Logic Editor in our Manual. For data paths, there are "data hints" included underneath the path input to help provide potential next steps in the path.

For an example, this filter could be used so only municipalities with an attachment agreement type called "Municipal" can submit the application type we've created called "Banner Applications."
Application Statuses

Application statuses represent each step in an application workflow. Users can click and drag the order number on the left of each status to reorder the view of the statuses; however, the view order does not affect the portal operation. The three dot menu on the rightmost of each status renames or deletes the status.
*Be cautious when making this change that you update any applications currently in the status you rename or delete.
If you click on the downward-facing carrot arrow to the left of the three-dot menu, this will open the details of the Application Status.
Entry Points
No decisions or actions are needed for this part of the application status; it's purpose is to help easily visualize which status the application could have been in before changing to this one (shown in "Status"), and which button (or "Item") was pressed to change to this status.
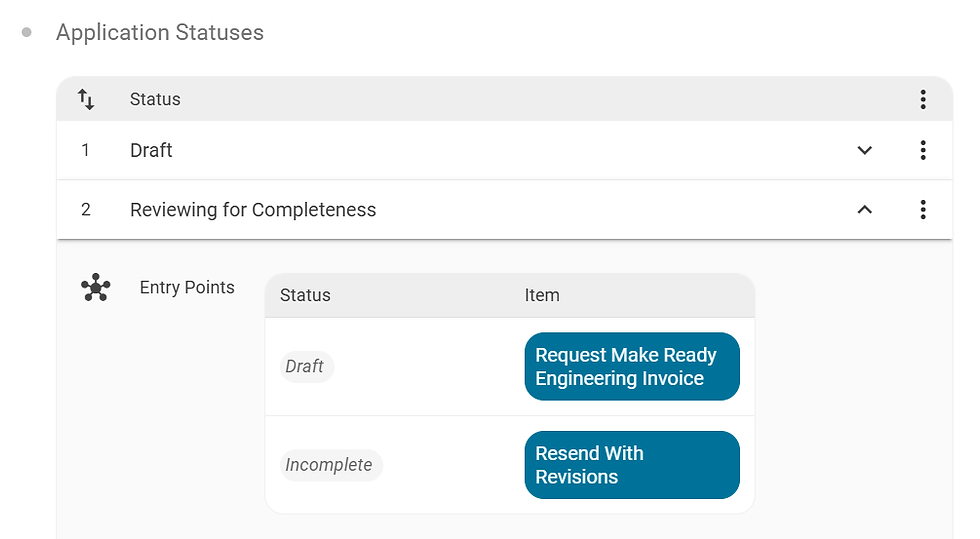
For example, one of the entry points for the "Reviewing for Completeness" status is that when the application is a "Draft," and the "Request Make Ready Engineering Invoice" button is pressed, then the application enters the "Reviewing for Completeness" status (see the screenshot above for reference).
Write Access

In the details of the Application Status, Write Access specifies what type of user can edit the application or job while in this status. User type options include applicants, engineering contractor, and review contractor, which can be specified under User Options (which is covered later in this manual).
Application is Active
Underneath the Write Access table are the "Active for Engineering" and "Active for Applicant" checkboxes.

These are used for detecting conflicts between overlapping jobs. Typically, most statuses will be active, but there may be some statuses such as Draft, Incomplete, or Canceled that you may wish to exclude from conflict logic.
Color
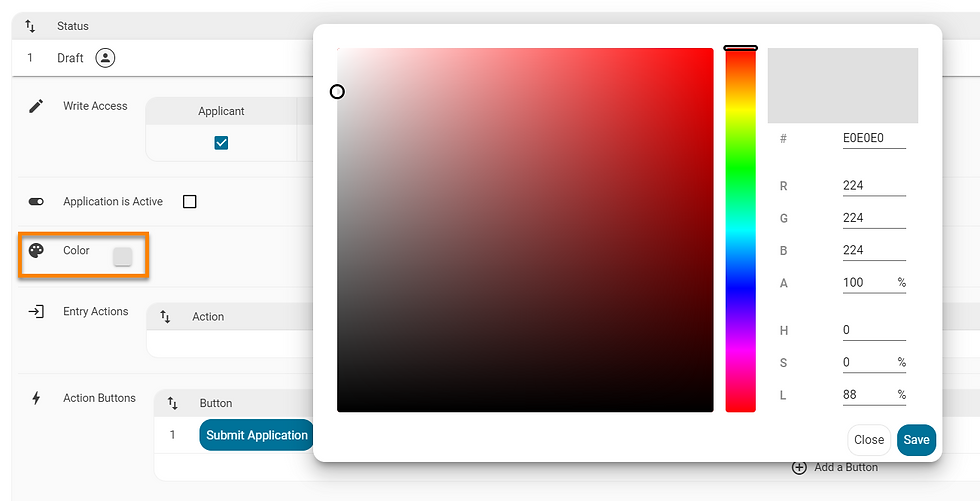
This controls the color of the application dot on the pole-application-overview page.

An example use case of this would be to color applications based on which entity is responsible to move the application through the status.
Entry Actions
Entry Actions are performed automatically as soon as an application enters this application status. There are many actions available for configuration as described below.
Set Metadata
This Entry Action sets a job metadata attribute on the application. (This is an attribute that exists at the job-level.) You can select the attribute to change and specify its value using custom logic via the Logic Editor.
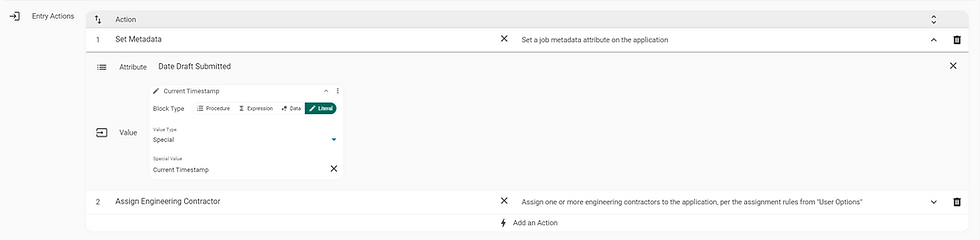
For example, you can set the Date Application Complete attribute to the current time for the status "Reviewing for Completeness."
Set Status

This Entry Action, Set Status, allows you to change the status of the application. You can select which status to automatically send the application to.
Set Timer

This action sets a timer on the application that can trigger additional actions when it goes off. Check out the Timers section for more information about how timers can be configured. You will need to have timers already created in order to select a timer from the dropdown.
Change Timer Length

This Entry Action allows you to adjust the length of an existing timer on the application. Select the timer to adjust as well as the length of duration to adjust it by. (This length of duration will replace the original duration.)
Clear Timer

Clear a timer on the application. (Timers are cleared automatically on status changes.)
Assign App Number
Generates an application number by assigning a value to the "App Number" attribute. There is a counter in the database that tracks the current app number.
Assign Engineering Contractor
Assign one or more engineering contractors to the application, per the assignment rules from User Options.
Assign Review Contractor
Assign one or more review contractors to the application, per the assignment rules from User Options.
Set App Timeline
Set a timeline on the application. Timelines are currently not configurable, but support can help you create one.
Check In Poles
When selected, this checks in this application's poles (updating the 'poles entry' for the application). While pole check-in and check-out automatically happens when the application moves from 'active' to 'inactive' (or vice versa), this manual action can update the poles entry if the pole count has changed. "Checked-in" poles count towards a company's submission limit.
Generate Export

Use this to run a custom data export. Under the details of "Generate Export," select the export to run from the dropdown. If a utility company user needs to run custom code or send data to an external server, support can help set up these exports and run them with this action.
Send Email

This action sends an email to one or more portal users. Under the details of this Entry Action, you'll notice inputs for "User Editable," "Send to Applicant," "Send to Utility," "Additional Addresses," "Subject," "Body," and "Template Items."
When "User Editable" is checked, users can see and edit the email as needed before sending it. When "Send to Applicant" is checked, the applicant will receive the email. When "Send to Utility" is checked, the utility will receive the email. "Additional Addresses" is an input where you can enter other addresses (other than the applicant or utility) to send the email to.
The "Subject" input is the subject line of the email. Variables (defined in the "Template Items" section) use $(variable_name) notation. A subject, for example, might be: $(attacher_name) - $(app_number) - "$(app_name)" - Status set to $(status).
The "Body" input is the body of the email. Again, Variables use $(variable_name) notation. For example:
$(submitted_by),
$(attacher_name)'s application $(app_number) - "$(app_name)" has been set to the $(status) status.
The application can be accessed at $(url).
Let us know if you have any questions,
$(utility_company)
The "Template Items" section is used to define variables that can be used in the subject and body of the email. Values are specified by custom logic using the Model Editor. Use the "data hints" to build your data path.
Action Buttons

Users click on Action Buttons to advance the application to the next step or take another action. Under the details of this Entry Action are many sections for customizing the Action Button.
Label
The "Label" section is a text entry input that allows you to edit the title of the button, or the text that will show up on the button.
Color
Use the color picker to determine the color of the button.
Icon
This optional field allows you to choose an icon to accompany the label of the button; it'll show up to the left of the label.
Access Permission
This input controls which users the button is visible to and who can press it. Access permission can be granted to applicants, engineering contractors, review contractors, and/or utility company.
Prompt Action
This is the effect of the button and determines what kind of prompt is activated.
Show Confirmation Dialogue: uses a confirmation prompt for the user to validate the button press
Link To Agreement: a way to sign documents electronically
Show Deselect Poles Dialogue (LEGACY): legacy option that provides the applicant with a way to remove poles from the application after they have submitted it
Confirmation Title
The subject or title of the confirmation prompt.
Confirmation Body
The content or body of the confirmation prompt.
Confirmation Button Label
The label or title of the button the user selects to confirm the prompt.
Confirmation Prompts
Allows the user who's clicking the button to enter metadata attributes to set on the application.
Complete Actions
The actions to take when the user clicks the button. The actions available in this list are the same as in Entry Actions.
Hidden
Use the Logic Editor to define custom logic that returns TRUE when the button should be hidden.
Application Attributes

Moving on from Application Statuses, Application Attributes are what is visible in the main attribute block at the application level. These are also visible in each application in the Maps page. Let's take a look at the details of Application Attributes.
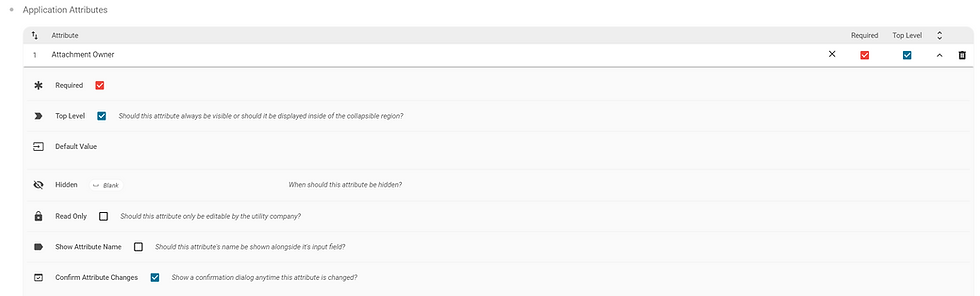
Required
This marks the attribute as required before the app can be submitted or advance to the next status.
Top Level
The application's attribute block is semi-collapsible. If Top Level is checked, the attribute will always be visible, even when the block is collapsed.
Default Value
A value assigned to be automatically set on the attribute.
Hidden
Using custom logic in the Model Editor, write a condition statement that returns TRUE when the attribute should be hidden.
Read Only
When this checkbox is marked, only the Utility can edit the attribute.
Show Attribute Name
When this checkbox is marked, the attribute name will be visible as a label alongside the input field.
Confirm Attribute Changes
This forces a confirmation dialog for the user to confirm before committing changes to the attribute.
Pole Attributes

Pole Attributes are visible in the list of poles in the application. These are also located on each pole and synced in the Maps page.
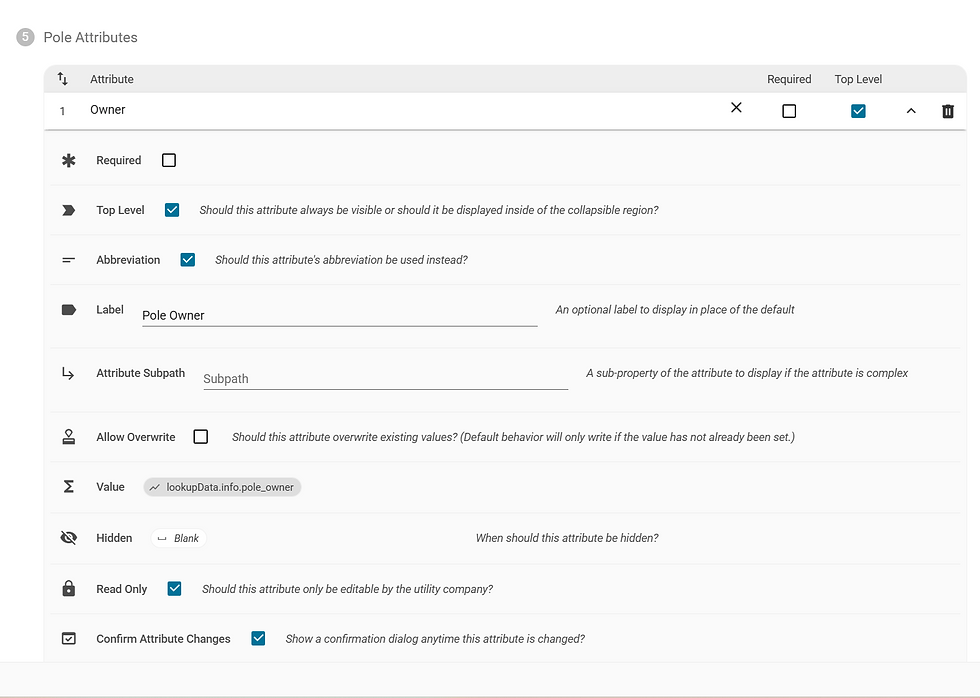
Required
This marks the attribute as required before the app can be submitted or advance to the next status.
Top Level
The Pole Attribute list is semi-collapsible. If Top Level is checked, the attribute will always be visible, even when the list is collapsed.
Label
A label that is used to display the attribute that can be used if the attribute name is not sufficient.
Attribute Subpath
The Attribute Subpath is where you type out the property name of a complex attribute's sub-property. For example, if you wanted to specify the text on a Pole Tag, you'd use the subpath of 'tagtext.' When you enter an Attribute Subpath, a "Subpath Attribute" dropdown will appear for you to select the sub-property attribute.
Allow Overwrite
When checked, this enables attributes to be overwritten if there is an existing value.
Value
This uses custom logic via the Logic Editor that returns the value to set the attribute to.
Hidden
Use the Logic Editor to define custom logic that returns TRUE when the attribute should be hidden.
Read Only
When checked, this attribute can only be edited by the utility company.
Confirm Attribute Changes
This forces a confirmation dialog for the user to confirm before committing changes to the attribute.
Attachment Types
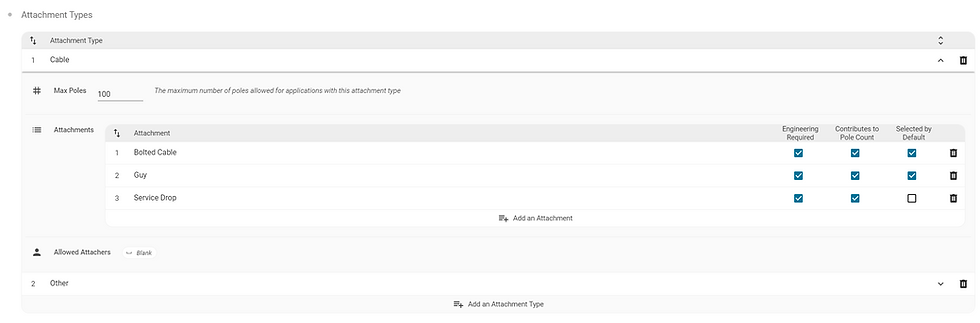
Attachment types can be used to differentiate between lists of attachments (i.e. cables vs. cabinets vs. holiday decorations) that use the same status flow but have different per-app pole count maximums or allowed attacher companies.
Max Poles
Max Poles is the maximum number of poles allowed for applications with this attachment type.
Attachments
A list of attachments available under the attachment type. For example, if the attachment type is "Cable," attachments may include "Bolted Cable," "Guy," and "Service Drop" (as pictured above).
Engineering Required
When checked, adding this attachment to an application will set the "engineering_required" metadata attribute on the application (useful for logic to show different buttons based on the engineering requirements of the application).
Contributes to Pole Count
When checked, this attachment type will add to the pole count, which is restricted by the maximum value specified in "Max Poles."
Selected by Default
When checked, this particular attachment will be auto-selected for use within the application when an applicant creates an application and selects the associated "Attachment Type."
Allowed Attachers
Through the Logic Editor, custom logic is used to return TRUE if an applicant is allowed to submit this attachment type.
Timers
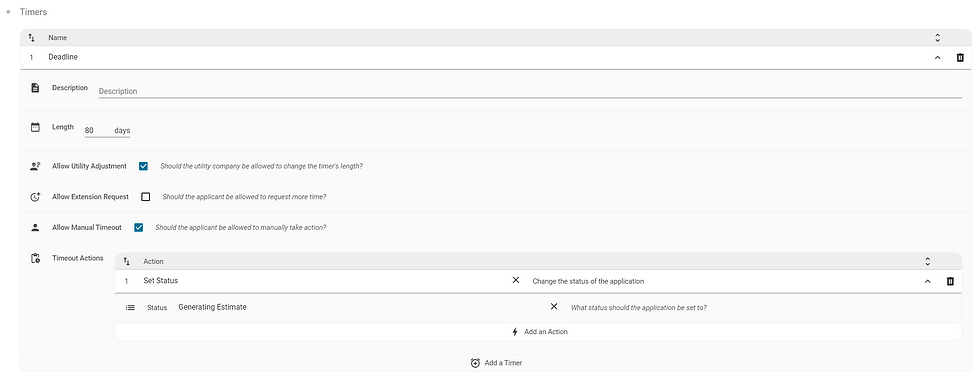
Timers are designed to run certain actions after a specified duration of time. The timer can be used anywhere in the application type. You can type in the "Name" line directly to rename it.
Description
This field is used to describe the timer in more detail and is visible when the timer is clicked.
Length
This is the duration of the timer.
Allow Utility Adjustment
When checked, utilities can adjust the timer per application.
Allow Extension Request
When checked, applicants can request additional time.
Allow Manual Timeout
When checked, timers can be overridden by manual selection.
Timeout Actions
These are actions to be completed upon timeout. The actions available in this list are the same as in Entry Actions.
Warnings

Warnings enable users to use custom logic to bring information to the user.
Description
The "Description" field is the body or content of the warning modal as it will appear to the user.
Applies To
This field is for whether the warning applies to the application as a whole or to individual poles.
Severity
You can specify what effect this information has on portal functions.
'Info' provides content to the user in a standard, blue dialog.
'Warning' provides content to the user in a yellow warning dialog.
'Error' is a red modal that informs the applicant that changes must be made before moving forward with the application; this prevents the user from moving forward.
Condition
The Condition is the custom logic that returns TRUE for when the user should see the warning.
User Options

User Options control how the portal appears and functions for different users.
Allow Drafts Before Approval

When this checkbox is checked, applicants can create drafts before they are an approved applicant.
Submission Window Length

The submission window limits the number of poles that an applicant can submit to in a specified duration of time (which is specified in the Submission Window Limit). This length is the duration of the submission window.
Submission Window Limit

The Submission Window Limit is the maximum number of poles a company can submit for within the submission window length. If the attacher exceeds this value, they are unable to submit new applications until the per-window count falls below this limit.
*Together, the Submission Window Length and Submission Window Limit make up the submission limits. They specify the window of time in which attachers can apply to the maximum number of poles.
Prevent Applications

When this checkbox is checked, applicants cannot submit more applications if they have reached their submission window limit.
Companies with Full Map View
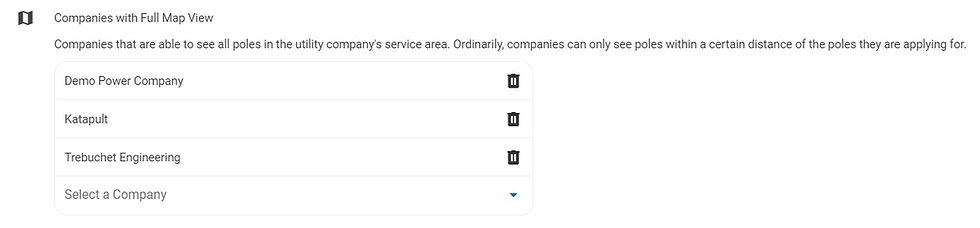
By default, utility map data is restricted to a radius of 1200 feet around the poles being applied for. This "Companies with Full Map View" setting enables specified companies to have full view of the utility map data without being restricted.
Review Contractors

A review contractor is a utility or utility representative who is responsible to ensure application quality on behalf of the utility. Companies from this list are added as review contractors (with write permission) when:
The "Add Review Contractor" action (in Entry Action, Button Action, and Timers) is run on the application, and
The "Assignment Function" set in this section using custom logic returns TRUE for the application (with access to the app's metadata)
Engineering Contractors
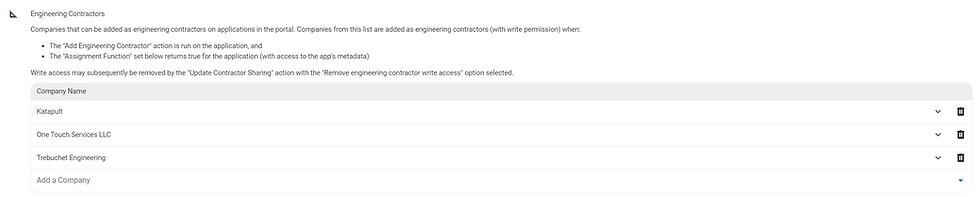
An engineering contractor is an attacher representative responsible for ensuring application quality on behalf of the attacher. Companies from this list are added as engineering contractors (with write permission) when:
The "Add Engineering Contractor" action (in Entry Action, Button Actions, and Timers) is run on the application, and
The "Assignment Function" set in this section using custom logic returns TRUE for the application (with access to the app's metadata)
Write access may subsequently be removed by the "Update Contractor Sharing" action with the "Remove engineering contractor write access" option selected.
Shared Pole Limit

Sometimes a single company has multiple attachment agreements. Shared pole limit enables you to create a group of companies whose application pole counts should be counted together when calculating pole limits.
Submission Groups

This can be used to customize submission limits (the submission window length and submission window limit). For example, submission limits might only apply to certain regions or attachment types. Reach out to support to help set up this feature.
Operation Centers
*Operation Centers is coming soon; it is currently under development.
This functionality will be related to setting utility company admins to receive emails based on regions.
Timeline Dates

Timeline Dates are job metadata date attributes to display in the "Recent Activity" section in the application view.
Display Options
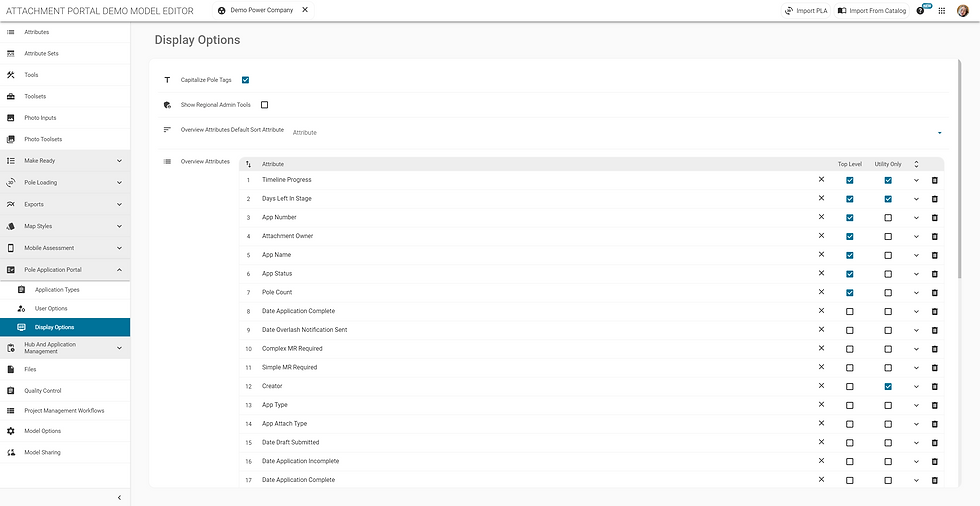
Display options affect the view of the portal for all users.
Capitalize Pole Tags
When checked, all alphabetical characters in a pole tag will be capitalized.
Overview Attributes Default Sort Attribute
The attribute selected in the drop down controls how applications are sorted in the app overview page. Apps will be sorted based on this attribute in descending order by default.
Overview Attributes
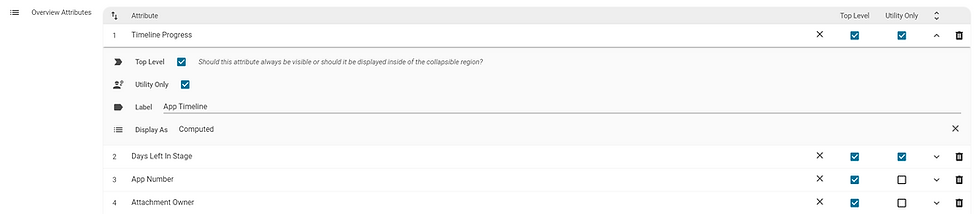
Overview Attributes are the list of attributes visible for each application on the App Overview page. The order of the attributes can be changed by clicking and dragging them.
Top Level
If Top Level is checked, the attribute will always be visible; otherwise, it will be hidden under the dropdown.
Utility Only
If Utility Only is checked, this attribute is only visible to the utility company.
Label
This step is optional. This is the label or title to use for the attribute.
Display As
This step is also optional. This controls how the value of the attribute is displayed if the value is not sufficient.
Computed: calculates the value
Boolean: displays as TRUE or FALSE
Date: converts the timestamp to date format
Company: displays the company name rather than the ID
Thanks for reading! If you have any questions, reach out to support at 717.430.0910 or support@katapultengineering.com. How can we improve our documentation? Let us know in the comments below!


Comments