%20small.png)
Katapult Pro Equipment Setup
- Leanne Weaver
- May 2, 2024
- 4 min read

Updated: Dec 11, 2025

Content Links
Camera Setup
Before setting up your camera, please see our Katapult Pro approved cameras list. For universally required settings for our approved cameras, the first step is setting the date and time on your camera. Next, set your camera to 'P' mode by turning the dial on the top of your camera. Distortion correction should be on, unless you are using a legacy combo (see the bottom of the approved cameras list). (For the Canon EOS R100 with the RF24-105mm F4 7.1 IS STM lens, distortion correction is automatically on and cannot be manually turned off.) For image settings, it should be no Raw and large with a 3:2 aspect ratio.
The rest of this section will explain where to find these settings. All supplemental visuals used are based on the SL3 SDLR body.

To set the date and time, click the menu button on the camera body to open the settings. This will open on the "Shoot settings." Use the arrows arranged in a circle on the camera body to navigate over to the "Function settings," then click the center button to select the "OK" option.

This will open the Function settings options. Click the right arrow to navigate to page 2 of these options, then click the down arrow to navigate to the Date/Time/Zone option. (For the Canon EOS R100, this will be on the first page.)

On this screen, you'll be able to set the date, time, and time zone.

Next, set your camera to 'P' mode by turning the dial on the top of your camera.
For image settings, it should be no Raw and large with a 3:2 aspect ratio. To find these settings, navigate back to the "Shooting settings" from the menu.

Under the first page is the "Image quality" option.
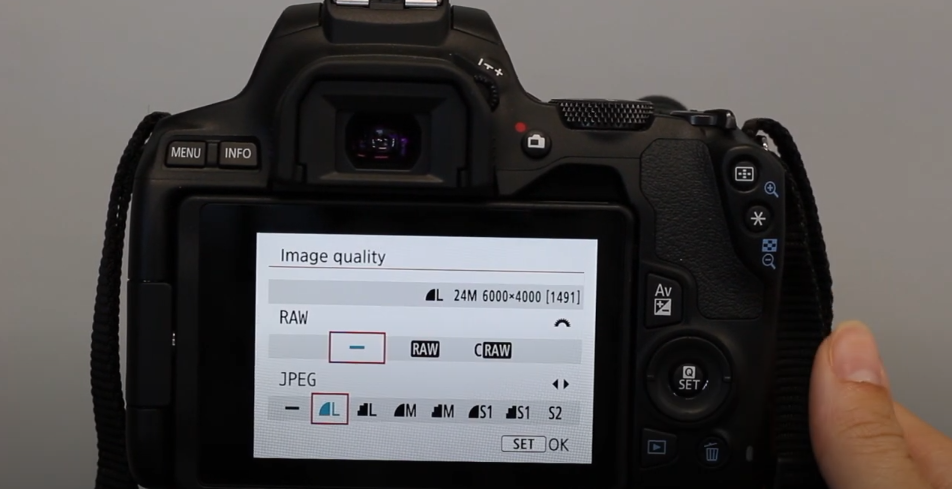
When this is selected, the "RAW" section will have three options. You want to make sure the dash is selected (see above image), which indicates "no RAW." (To change the selection, use the camera's wheel.) The "JPEG" section will have will have several options; make sure the L with the smooth sector (see above image) is selected. (To change the selection, use the camera's arrows.) On the EOS R100, go back to the Shooting settings page and choose the "Still img aspect ratio" option to ensure the 3:2 aspect ratio is selected.

Go back to the first page of the Shooting settings and open the Lens aberration correction option. Find "Distortion correction" here and make sure it is turned "ON." Again, for the Canon EOS R100, the distortion correction will be automatically enabled and cannot be turned off manually, and for legacy body/lens combinations, Distortion correction should be turned "OFF."
Camera Care
Exercise caution while switching lenses. Putting your lens on quickly and limiting how often you remove your lens prevents dirt from getting trapped between the camera and the lens, which could cause the camera to throw an error. When the lens is removed, the sensor in the camera is exposed and could become damaged by sun, dirt, or air, which can affect the image or even ruin the camera, so use caution.
Clean your lens regularly with a microfiber cloth, and avoid touching the lens glass or sensor with your fingers. If you notice specs, blurry spots, etc., in your photos, try cleaning the exterior facing lens glass. Keeping a clean camera not only allows it to last longer, but can help prevent errors and save time in the long run. Use a UV filter and lens hood with your camera to also help with longevity.
Stick Calibration
Proper sticker placement is essential for accurate data collection. Your Height Stick includes two types of target stickers:
Black & White Target Stickers - Place these at 16.5', 14.5', 10.5', 6.5', and 2.5'. Precise placement at these measurements is crucial for data accuracy.
Purple Target Stickers - Place these at one-foot intervals from 5' to 16'. These serve as backup calibration points when the primary black & white stickers are obstructed. The center of each target marks a foot on the Height Stick and again, precision is crucial.
Place 'no tag' and 'no birthmark' stickers on the opposite side of the stick from your target stickers (we recommend slightly below 5').
IMPORTANT: Verify all sticker placements to ensure they are precise and accurate. Even small deviations from the specified measurements can compromise your data collection.
Stick Care
It is advised to clean your stick periodically with a hastings wipe. Be sure to replace your stick after heavy usage, or if damaged.
Lowering your stick to avoid energized conductors that are around or below 17' is important for personal safety. Lower your stick from the top section down when avoiding power conductors. If a stick is lowered from the bottom section, it will provide inaccurate data as heights are measured from the bottom section upwards. However, to avoid excessive wear on the buttons between the stick sections, keep your stick extended between poles and mid span sections.
Safety/PPE
The height stick is not rated for contact with energized conductors or equipment. Always lower your height stick from the top section down near low-hanging conductors to avoid contact.
Wear recommended protective footwear, high-visibility vests, eye wear, and hard hats.
Use recommended roadside signs and bubble lights for vehicles.
Thanks for reading! If you have any questions, reach out to us at support@katapultengineering.com or 717.430.0910. How can we improve our documentation? Let us know in the comments below!


Comments