%20small.png)
Photos Overview and Classification Manual
- Zachary Carlson
- Mar 29, 2021
- 8 min read
Updated: Oct 21, 2025

Content Links
Photo Classification is the process of classifying, calibrating, and entering initial data onto the photos that were gathered during the field collection process.

Open Katapult Pro in Chrome. You can navigate to Katapult Pro Photos by clicking on the App Tray menu button at the top right, then by clicking the “Photos” button. This will open a new page, which will display the photos for the job you're currently in. At the top left of the page is the Job Chooser. You can navigate to other jobs by searching for the job in the dropdown.

The folder icon in the toolbar is to "Open Job Chooser." You can use the “Collection Sets” button to the right of the "Open Job Chooser" button to filter photos from the job based on when the photos were uploaded. The days uploaded will be displayed, and you can check which days' photos you want to view.
The button to the right of the Collection Sets button is used to select all the photos within the job (and is aptly named "Select All Photos.") When this button is pressed, the photo thumbnails at the bottom will all be highlighted yellow, and a blue button will appear at the bottom right to show the number of photos selected.

You can select the “X” to deselect the photos, or click the three dot menu to see various options.

Clicking the three dots will give you the option to unassociate photos, associate photos, delete photos from the job, or sort the photos by various categories.
Selecting photos can also be done by holding the “Ctrl” key on the keyboard and clicking the photo thumbnails from the bottom ribbon that you want, or holding shift and clicking to a photo to highlight a sequential series of photos. Again, click the “X” to deselect the photos.
Katapult Pro Photos Layout

As you select a photo from the bottom photo ribbon, the photo will be displayed in the center of the page. You can see which image you are currently on at the top of the window.

Here you can see the photo above would be photo 2 of 39. You can see a preview of the previous and next photo to the sides of the selected photo.
You can move through the photo set by clicking the forward or back arrows to the left and right, or by using the arrows on your keyboard. You can also click on any photo within the ribbon.
The little upward-facing carrot arrow at the bottom of the picture, "^," will open the Photo Details for photo info and editing.
Photo Colors

As the photos are classified, the color of the thumbnail within the photo ribbon will change.
Blue - These are sync shots that have been entered with the job details information.
Gray - These are photos that have no data on them yet. They have not been classified.
Green - These are photos that have been classified or contain height data.
Orange - These are photos that are classified as “Cable Tag”. They are a different color to make it easier to go through the photo ribbon and find Cable IDs.
Red - This is the photo that is currently displaying in the middle of the screen in Katapult Pro Photos.
Yellow - These are photos that are selected, which can then be unassociated, deleted or sorted

Darker Tip - If the photo has a darker shade of its color cap at the top, it means the photo is associated to a node within the job.
Red Tip - The cap will turn red if there is a location selected in the Maps page to indicate that those photos are associated with the selected location.

Cyan Tip - The cap will turn cyan if those photos are associated to the same location that the selected photo (the red photo tab) is associated to.

*If you see a dark gray tab, this is a photo that was unable to fully upload because the upload process may have been interrupted. You'll have to re-upload the pictures. You can re-upload the whole picture set, and any duplicates will be skipped.
Classification
To start classifying photos, click on your starting photo in the photo ribbon. You can start anywhere along the ribbon, and multiple users can classify photos in the same job.
*If multiple users are in the same job classifying, you will see the other user’s avatar over top of the photo they are currently working on.

Next, click on the photo to create a temporary input marker, opening the one-click-menu, and click on the black icon to the left of the dropdown, the Photo Toolset Chooser. This button allows you to switch between photo toolset picklists that would be used in annotation and classification for different workflows. Choose the "Classify" option under this button.
*Some clients will have a combined Measure and Classification photo toolset. If that is the case, you will not need to click to change the photo toolset settings.
Once selected, you can use the dropdown to see the pick list of current classification options. There will also be a keyboard shortcut in parenthesis after each classification.
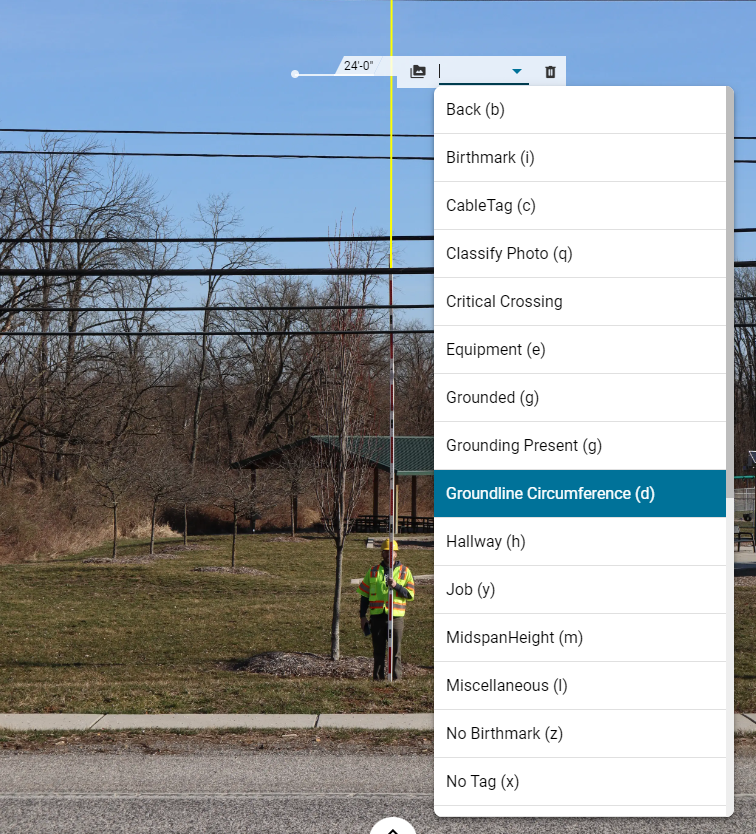
Until you learn the shortcuts, you can scroll through the list to choose the correct photo classification.
*You can use the Model Editor if you need to change the shortcuts or change the classification types. Reach out to support@katapultengineering.com if you need assistance. If your fielders do not take certain photos that you would like removed from the dropdown or your team has photo types that are not in the dropdown that you would like to be added, reach out to our team.
As you classify, a photo data chip (or photo chip) will be added to the photo at the top right of the photo window for that photo.

You can click on the chip to expand its details. Using the three dot menu, you can add or remove attributes, or you can delete the chip by clicking the trash can icon.
If a photo contains multiple pieces of information used for classification, you can enter as many classifications as you need. For example, if a photo had two pole tag numbers in it, you could have two "pole_tag" chips on that photo with each one having data for the different tag. If the photo also contained the birthmark, you could classify the photo as a birthmark shot as well.
For any photo that will require calibration (Midspans and Pole Heights), once the classification is selected, a routine will start within the software.
For example, if you have a midspan shot, and you click “m” on the keyboard to utilize the midspan shortcut, the software will start the midspan height routine.
*If you come across a pole height photo where you notice the height stick is not flush against the pole, do not start the height routine. This photo cannot be used as the pole height photo and cannot provide accurate measurements. Contact your field team and tell them to re-field the pole.

The software will insert the Midspan Height chip at the top right corner, and you will choose the midspan type, or what the span is over.

Once you select that, the software will start with the height routine. So your very next click will place a 16.5’ height marker. Zoom in on the photo to look for the top calibration sticker at 16.5'. Once your crosshair (circled in orange) is in the middle of the white square, go ahead and click.

As soon as you click, the software will automatically go to the next height in the routine, which is 14.5'. You can zoom out on the photo and zoom in at that next height calibration sticker, or you can use the down or up arrows on the keyboard to pan down or up the photo at your current zoom level. Each click will place the anchor and advance to the next anchor in the routine. Repeat this process until the routine has finished.
You should see the calibration turn green, and the calibration line (yellow line) will extend up from the top of the height stick through to the top of the photo.
For pole height shots, there will be an extra step after the height routine, where you will need to place the pole top marker at the top of the pole.
The software will also give you warnings depending on the approximate accuracy of your calibration.
*These warnings are useful for if you need to place a calibration anchor on the red and white lines because of a calibration target being covered. Just because the markers turn green does not guarantee the +/- 3 in. accuracy. You are guaranteed accuracy if you use the calibration targets or properly make use of the red or white lines on the stick.

If the calibration is yellow, one of your anchor points is definitely off a bit.

A red calibration shows that one or more is off to a greater extent. Double check that your anchors are placed correctly and that the stick is fully extended. Accuracy of measurements can only be guaranteed if the calibration is performed correctly at the given targets.

Once anchor markers are placed, you are able to move them around or change the height by clicking on them and clicking the dropdown. This is useful when a branch, bush, or other obstruction is blocking a calibration sticker.

For classifications that require data to be entered, such as tags and birthmarks, you will be able to enter the necessary data in the text line of the chip's details.
Photo Info and Editing

If you need to see the photo details or make any edits to the photo to help enter data, you can expand the window below the photo.

The Info section will display the photo's information. Here, you can see all the camera and lens settings, as well as the date the photo was taken and the users that uploaded or edited the photo.
*If a midspan or pole height photo will not calibrate, you may see an error message that says "camera unrecognized." You can check the settings to see what might have gone wrong, but ultimately if the settings were wrong or an unapproved camera was used, the height photos will need to be retaken.
You can also click on the blue “FIND IN MAPS” button in this info section to zoom to the location in Katapult Pro Maps where the photo is associated.

Under Edit, you can mark a photo for re-upload, rotate the photo, and you can adjust the photo’s brightness and contrast. (Our software skips photos already uploaded to a job when photos are re-uploaded, so marking a photo for re-upload means that photo will get overwritten on re-upload.) Clicking the “Reset Filters” button will set the brightness and contrast back to zero.

The last section will display the various make ready needed if the photo is in MR view.
To collapse this photo details window, click the arrow below the photo again.

Lastly, the buttons at the top will change the view of the photo. The far left button is “Make Ready View.” Clicking this button will switch the photo to display the make ready clearance violations. The middle lock button is “Read Only” mode. Just as in Maps, you will be able to view photos in read only mode, but you will not be able to make edits. The last button to the right of read only mode is “Cable Trace View”. Clicking this button will open up the trace view, where the height of attachments can be marked.
360 Photos
Katapult Pro supports uploading and associating 360 photos. Currently, 360 photos are not valid for calibration within Katapult Pro, but offer much more contextual data than other image formats. While calibration is not supported on these images, annotations may still be used. These images could prove to be crucial for workflows such as underground workflows. Make sure your 360 photos have a perfect aspect ratio of 2:1.
On the Maps page, there is an icon that indicates the photo is a 360 photo. When it is opened in the Photos page, you'll see an image icon in the bottom left corner that toggles between a panoramic view and an interactive, spherical view. Click and drag the photo to move around the spherical view and scroll up and down to zoom in and out.
When it is opened on the Maps page, you can click the image icon in the top right corner of the photo to toggle between a panoramic view and an interactive, spherical view. The button next to it will download the image when clicked.
*Make Ready and Cable Tracing are discussed in more detail in their respective manuals.
Thanks for reading! If you have any further questions, reach out to us at 717.430.0910 or support@katapultengineering.com. How can we improve our documentation? Let us know in the comments below!


Comments